cat << EOF > 文件名
内容行1
内容行2
内容行3
EOF
-
Linux中使用cat EOF 将文本写入文件
-
让Linux用户sudo操作免密码
# vi /etc/sudoers
在最后面加一行
gex ALL=(ALL) NOPASSWD: NOPASSWD: ALL -
使用Dockerfile 创建自己的Docker镜像
1,一样是需要在 https://www.docker.com/ 上有自己的账号。
2,vi Dockerfile 里面如下写
FROM ubuntu:latestRUN apt update -y \
&& apt-get update \
&& apt install -y curl wget unzip jq \
&& curl -sL https://aka.ms/InstallAzureCLIDeb | bash \
&& wget -O – https://apt.releases.hashicorp.com/gpg | gpg –dearmor -o /usr/share/keyrings/hashicorp-archive-keyring.gpg \
&& echo “deb [arch=$(dpkg –print-architecture) signed-by=/usr/share/keyrings/hashicorp-archive-keyring.gpg] https://apt.releases.hashicorp.com $(lsb_release -cs) main” | tee /etc/apt/sources.list.d/hashicorp.list \
&& apt update \
&& apt install terraform -y \
&& curl “https://awscli.amazonaws.com/awscli-exe-linux-x86_64.zip” -o “awscliv2.zip” \
&& unzip awscliv2.zip \
&& ./aws/install \
&& rm -rf awscliv2.zip \
&& apt upgrade -y3,在存在Dockerfile的目录下执行
docker build -t qinzhen/ubuntu-az-tf:latest . (注意,末尾的 . 非常重要不可或缺)
在过程中可以看到进度,比如apt的安装过程或者报错等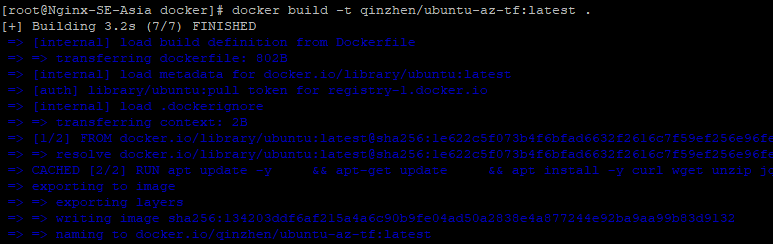
4,之后就是docker push环节
-
自己构建一个Docker镜像
1,一样是需要在 https://www.docker.com/ 上有自己的账号
2,docker run -it ubuntu:latest 运行一个你需要的环境,也可以先pull下来再run
3,在环境里安装自己需要的组件,下面的例子是我安装了azure cli和terraform
docker run -it ubuntu:latest
apt update -y
apt upgrade -y
apt install -y curl wget sudo vim unzip
curl -sL https://aka.ms/InstallAzureCLIDeb | sudo bash
wget -O – https://apt.releases.hashicorp.com/gpg | sudo gpg –dearmor -o /usr/share/keyrings/hashicorp-archive-keyring.gpg
echo “deb [arch=$(dpkg –print-architecture) signed-by=/usr/share/keyrings/hashicorp-archive-keyring.gpg] https://apt.releases.hashicorp.com $(lsb_release -cs) main” | sudo tee /etc/apt/sources.list.d/hashicorp.list
sudo apt update && sudo apt install terraform -ycurl “https://awscli.amazonaws.com/awscli-exe-linux-x86_64.zip” -o “awscliv2.zip”
unzip awscliv2.zip
sudo ./aws/install3,创建image:不要退出刚才的容器新连接一个ssh
docker commit -m “description” -a “author” <容器id> repository:tag“description”:描述信息。
“author”:作者名。
<容器id>:可以在就终端那里看到,形如root@2ce6712ef339:/#。可以看到<容器id>是2ce6712ef339。
reposiory:镜像仓库名,任取即可。
tag:镜像标签名,任取即可。
在本例中,生成镜像使用如下命令docker commit -m “ubuntu-az-terrafrom” -a “Zhen Qin” 6d726081f0fa qinzhen/ubuntu-az-tf:latest
4,将自建的Docker镜像推送至Docker Hub
docker push qinzhen/ubuntu-az-tf:latest -
Dockerhub上的镜像迁移到Harbor镜像仓库
1,到docker.io上注册账号。
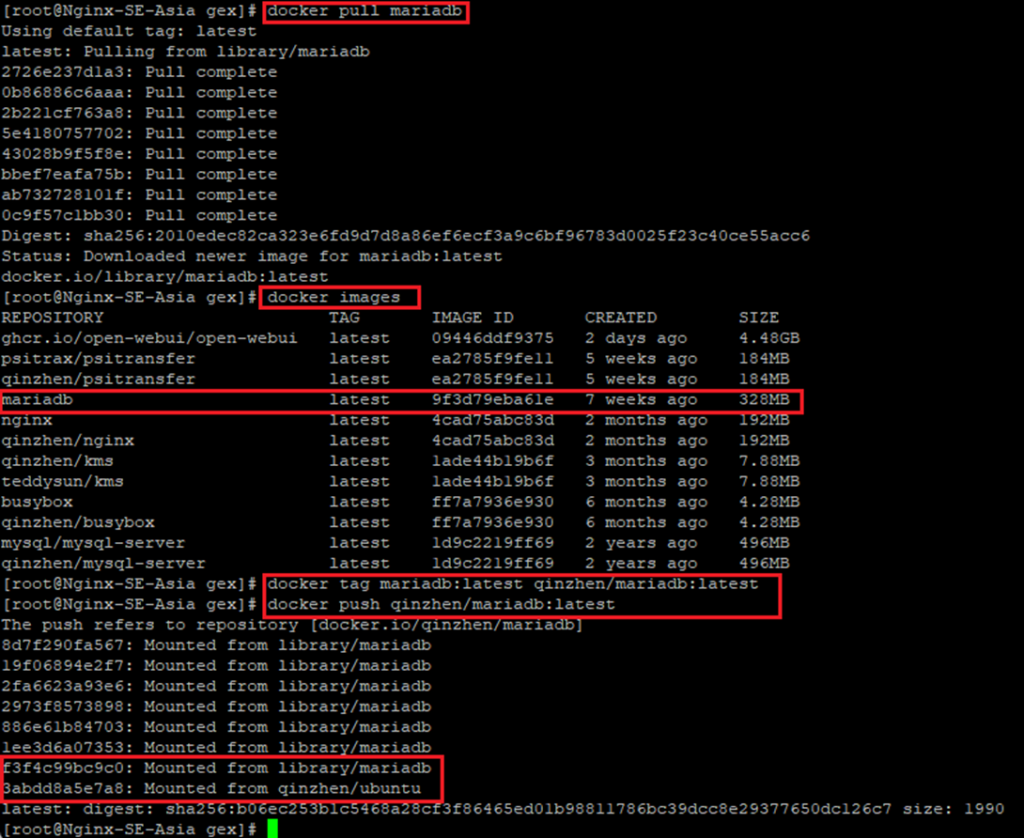
2,找一台装了docker的linux机器执行docker login登录docker hub
下载镜像
docker pull teddysun/kms
打标签
docker tag teddysun/kms:latest qinzhen/kms:latest
推送
docker push qinzhen/kms:latest
之后Docker Hub里就可以看到
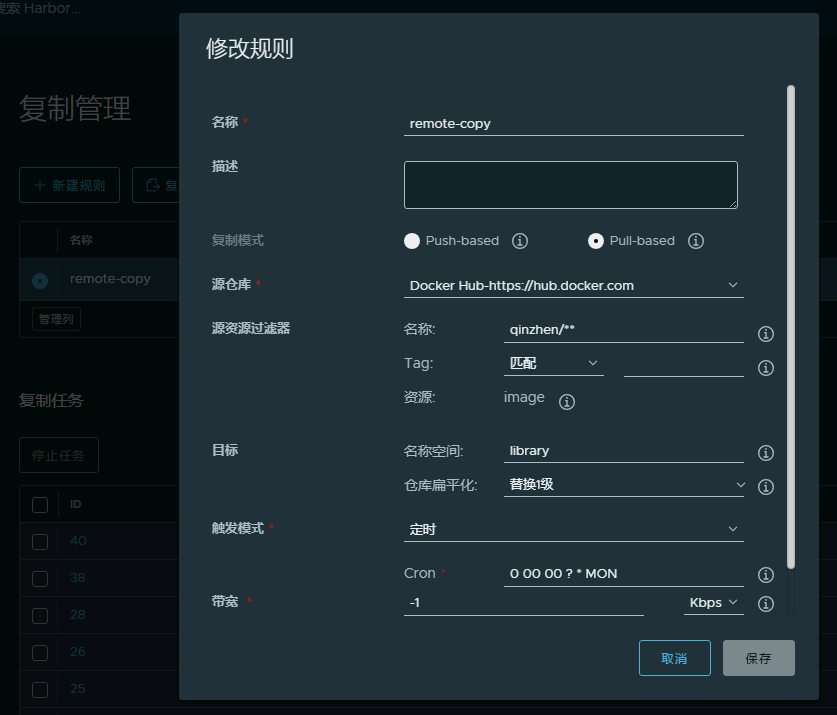
3,在harbor中创建–仓库管理
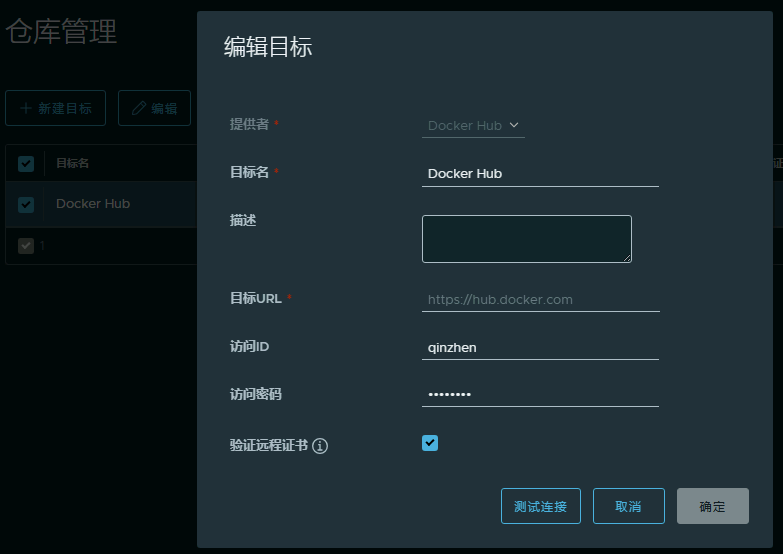
4,在harbor中创建–复制管理 (成功后点复制就可以下载所有之前打过标签的镜像)
-
Docker 中安装WordPress
-
Docker中安装Jenkins
使用以下方式可以在Jenkins中挂载企业CA,保证Jenkins的Git模块信任企业CA证书
docker run -d -p 8080:8080 -p 50000:50000 \
-v jenkins_home:/var/jenkins_home \
-v /etc/localtime:/etc/localtime \
-v /etc/ssl/certs/:/etc/ssl/certs/ \ #企业CA放在这个目录中映射到容器内
–restart=on-failure jenkins/jenkins:lts-jdk21首次安装初始密码位置 cat /var/lib/docker/volumes/jenkins_home/_data/secrets/initialAdminPassword
-
AlmaLinux 安装官方源Docker
sudo dnf config-manager –add-repo=https://download.docker.com/linux/centos/docker-ce.repo
sudo dnf install docker-ce docker-ce-cli containerd.io
sudo systemctl start docker
sudo systemctl enable docker
Dokcer 默认的映射卷位置 /var/lib/docker/volumes/
-
AlmaLinux 安装Nginx官方源主版本
vi /etc/yum.repos.d/nginx.repo
[nginx-stable]
name=nginx stable repo
baseurl=http://nginx.org/packages/centos/$releasever/$basearch/
gpgcheck=1
enabled=1
gpgkey=https://nginx.org/keys/nginx_signing.key
module_hotfixes=true[nginx-mainline]
name=nginx mainline repo
baseurl=http://nginx.org/packages/mainline/centos/$releasever/$basearch/
gpgcheck=1
enabled=0
gpgkey=https://nginx.org/keys/nginx_signing.key
module_hotfixes=true -
AlmaLinux 9 安装配置WireGuard
前言:相较于当下IPSec,OpenVPN等VPN技术,WireGuard被誉为下一代VPN技术,而且Linux的管理者Linus Torvalds已经将WireGuard合并至内核5.6中。所以所有使用新版本内核的服务器理论上都不需要安装WireGuard。参考的最佳实践链接 https://orcacore.com/install-configure-wireguard-almalinux-9/
安装部分:您必须在服务器上启用“wireguard”内核模块。为此,您可以使用以下命令:
sudo modprobe wireguard
然后,使用以下命令验证您的模块是否已启用:
lsmod | grep wireguard
如果 WireGuard 模块已启用,您应该得到以下输出:Output
wireguard 94208 0
libblake2s 16384 1 wireguard
ip6_udp_tunnel 16384 1 wireguard
udp_tunnel 24576 1 wireguard
curve25519_x86_64 36864 1 wireguard
libcurve25519_generic 49152 2 curve25519_x86_64,wireguard现在您需要永久加载wireguard 模块。为此,请运行以下命令:
sudo echo wireguard > /etc/modules-load.d/wireguard.conf
该命令将在AlmaLinux 9上的系统启动时永久加载wireguard内核模块。
最后,使用以下命令安装“wireguard-tools”软件包:
sudo dnf install wireguard-tools -y #该软件包用于管理 Wireguard 服务器。配置部分1: 首先需要生成私钥与公钥对用于通信验证
wg genkey | sudo tee /etc/wireguard/private.key #文件将会存在 /etc/wireguard/private.key
sudo chmod 0400 /etc/wireguard/private.key #给文件定义权限
sudo cat /etc/wireguard/private.key | wg pubkey | sudo tee /etc/wireguard/public.pub #通过私钥生成公钥
如果没记住可以查询公钥私钥内容
cat /etc/wireguard/private.key
cat /etc/wireguard/public.pub如果需要在服务器上生成其它服务器或客户端的公私钥。
mkdir -p /etc/wireguard/clients
wg genkey | sudo tee /etc/wireguard/clients/client01.key
cat /etc/wireguard/clients/client01.key | wg pubkey | tee /etc/wireguard/clients/client01.pub配置部分2:
服务器端配置(服务器作为VPN的HUB节点需要有真实固定IP并且开放指定的UDP端口,端口号自行指定)如果只在WireGuard虚拟网络中通信。不需要路由到下面的其它子网则不需要 在配置文件中定义 PostUp = iptables -A FORWARD xxxxx 和 PostDown = iptables -D FORWARD xxxxxxx
sudo vi /etc/wireguard/wg0.conf
[Interface]
Address = 10.100.200.1/24 # 此服务器在WireGuard网络中的IP地址和所属子网
SaveConfig = false # 可以是true或者false(true的话会在此文件的peer配置里自动写入客户端公网ip)
ListenPort = 12347 #服务器端监听的UDP端口
PrivateKey = CLInDXXXXXXXXXXXXXXXXXXXXXXXXXXXXXXXXXXPncWw= #服务器私钥
PostUp = iptables -A FORWARD -i %i -j ACCEPT; iptables -A FORWARD -o %i -j ACCEPT; iptables -t nat -A POSTROUTING -o eth0 -j MASQUERADE
PostDown = iptables -D FORWARD -i %i -j ACCEPT; iptables -D FORWARD -o %i -j ACCEPT; iptables -t nat -D POSTROUTING -o eth0 -j MASQUERADE[Peer]
PublicKey = T90oXXXXXXXXXXXXXXXXXXXXXXXXXXXXXXXTQLbzc= #客户端1的公钥
AllowedIPs = 10.100.200.11/32 #容许客户端连接的地址[Peer]
PublicKey = T90o2XXXXXXXXXXXXXXXXXXXXXXXXXXXXaeTQLbzc= #客户端2的公钥
AllowedIPs = 10.100.200.12/32 #容许客户端连接的地址配置部分3:
客户端配置(客户端可以在多层NAT之后,如果客户端配置里没有指定UDP端口,则客户端会使用随机UDP端口与定义的服务器UDP端口通信)
客户端如果是WireGuard客户端软件的话,在软件中创建空隧道就会自动创建密钥对(公钥和私钥)
[Interface]
Address = 10.100.200.2/24 (可以是/24也可以是/32不影响)
PrivateKey = 8ExJ6XvuXXXXXXXXXXXXXXXXXXXEDZyou7X2U= #客户端主机的私钥(不是服务器的私钥)[Peer]
Endpoint = 1.2.3.4:12347 # 目标服务器的公网地址及端口
PublicKey = T90o2KXXXXXXXXXXXXXXXXXXXXXXXXXXe9aeTQLbzc= #注意:这里填服务器主机的公钥
AllowedIPs = 0.0.0.0/1, 128.0.0.0/1 #客户端对外访问的路由地址范围,0.0.0.0/0 备选(/32的话会不通)
PersistentKeepalive = 25启动与管理部分:
sudo wg-quick up /etc/wireguard/wg0.conf
sudo wg-quick down /etc/wireguard/wg0.conf
systemctl enable wg-quick@wg0
systemctl status wg-quick@wg0
systemctl disable wg-quick@wg0